
It was a quiet Tuesday evening when I heard the sound that every audio enthusiast dreads: a sickening, plastic-on-hardwood crunch. My beautiful, newly polished bookshelf speakers had slowly vibrated their way off the top plates of their sleek metal stands, tumbling onto the floor. It was a stupid, preventable disaster. After spending hours finding the the best distance to sit from your bookshelf speakers, I had completely ignored the physical reality of kinetic energy. The speaker cabinet was perfectly smooth, the metal stand plate was perfectly smooth, and the acoustic vibrations acted like a tiny, invisible conveyor belt pushing my gear toward the edge.
The Heart-Stopping Danger of Micro-Vibrations
Most people think a speaker will only move if someone bumps into the stand. I used to believe that too, until I watched my left-channel speaker migrate half an inch during a heavy bass track. Every time your speakers push out sound, they generate physical cabinet vibrations. If you do not decouple those cabinets from the flat surface of your stands, they will slide. This isn’t just about protecting your expensive investment from a nasty fall; it is also about sound quality. When your speaker cabinet physically rattles against a hard stand plate, it ruins your imaging and adds unwanted distortion.
Early on, I tried to fix this by using cheap double-sided tape. That was a massive mistake. Not only did it fail to stop the micro-vibrations, but it also stripped the beautiful wood veneer right off the bottom of my cabinets when I tried to reposition them. I learned the hard way that you need a solution that grips firmly without permanent adhesive ruin. Just like how why your desktop speakers need isolation pads to stop desk vibration, your stand-mounted speakers need proper decoupling to stay put and sound their absolute best.
Is Blue Tack Actually Safe for Expensive Speaker Cabinets?
This is the question I get asked more than any other. Many audiophiles worry that reusable adhesive putties will leave greasy, permanent oily rings on high-end wood finishes or matte paints. It is a valid fear. While standard cheap mounting putty can indeed leave petroleum-based residue over time, premium museum-grade gel or dedicated acoustic Blu-Tack is incredibly safe and offers immense holding power. According to acoustic testing standards, soft elastomer materials can reduce cabinet vibration transmission by over 90%, proving that isolating your speakers does double duty by protecting them and tightening up your bass response. Have you ever walked into your listening room only to find your speakers have mysteriously shifted closer to the edge than you left them? Let me know in the comments below, because I know I am not the only one who has suffered from this creeping speaker anxiety. Fortunately, the fix is incredibly simple, cheap, and requires absolutely no drilling or permanent damage to your gear.
Step-by-Step Guide to Isolating and Securing Your Speakers
Securing your speakers is a lot like applying winter tires to a sports car; you are matching high-power performance with the right kind of physical grip. If you do not create a proper interface between the speaker cabinet and the stand plate, you are essentially letting your gear ice-skate on its own acoustic energy. To do this right, you need to prepare the surfaces, apply the decoupling material correctly, and compress it with the right amount of force.
Prepare the Surfaces Without Destroying the Finish
Before you place any adhesive or gel pad, both surfaces must be entirely free of dust and oils. Even tiny dust particles act like a layer of ball bearings, causing your isolation pads to slide. I learned this lesson when I tried to secure a pair of vintage oak monitors. I skipped the cleaning step, and a week later, one speaker had drifted dangerously close to the edge again. Grab a clean microfiber cloth and lightly mist it with water or a specialized wood-safe cleaner. Never spray anything directly onto the speaker cabinet. Wipe down the top plate of the stand and the bottom of the speaker cabinet, then let them air-dry completely for ten minutes. If you are dealing with persistent sticky residue from a previous owner’s tape experiment, you can learn how to clean a sticky volume knob on a vintage amp using similar gentle, non-destructive surface prep techniques.
Apply the Decoupling Material with the Four-Dot Method
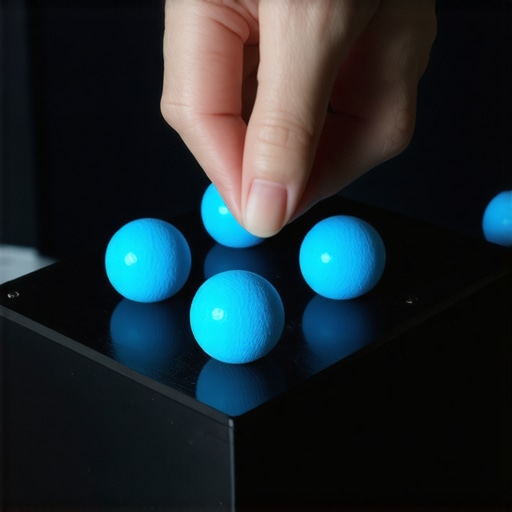
Take your acoustic putty or gel pads and roll them into four small, pea-sized balls for each speaker. Place one ball near each corner of the speaker stand’s top plate, about half an inch inward from the edges. Do not make these balls too large; if they are too thick, your speakers will wobble like a table with uneven legs. The goal is to create a stable, low-profile barrier. Once the four dots are in position, gently lower the speaker straight down onto the stand. Apply firm, even downward pressure with both hands on the top of the speaker cabinet for about ten seconds. You will feel the putty compress and grab the metal plate. This creates an incredibly strong bond that stops lateral movement completely while absorbing cabinet resonance. This mechanical isolation is just as crucial as electrical hygiene, which is why audio purists know why your active speakers need a dedicated power conditioner to keep interference out of your playback chain.
Test the Grip and Level the Cabinets
Once pressed down, give the speaker a gentle nudge from the side. It should not slide at all; instead, you should feel the entire stand move slightly with the speaker, showing that they are now coupled as a single physical unit. If your speaker tilts or rocks, one of your putty balls is too thick. You will need to lift the speaker off, roll that specific ball again, and re-apply. Achieving a perfectly level speaker ensures that your high-frequency drivers disperse sound evenly across your listening area, giving you that crystal-clear imaging you paid for.
When you start diving deeper into high-fidelity playback, you will quickly realize that the retail market is full of bad advice disguised as audiophile wisdom. The biggest myth circulating in the speaker community is that more isolation is always better. Enthusiasts spend hundreds of dollars on massive multi-layered gel pads, magnetic suspension feet, and elaborate floating platforms. In my experience, over-decoupling your speakers actually harms your soundstage. While you absolutely want to eliminate the micro-vibrations that cause a speaker to slide or rattle, isolating a cabinet too much allows the driver kinetic energy to push the cabinet backward. Instead of the driver cone moving forward with maximum force, the entire speaker body rocks slightly backward, destroying your transient response and making your music sound soft and lifeless.
Why Does Your Speaker Sound Hollow Even on Expensive Isolators?
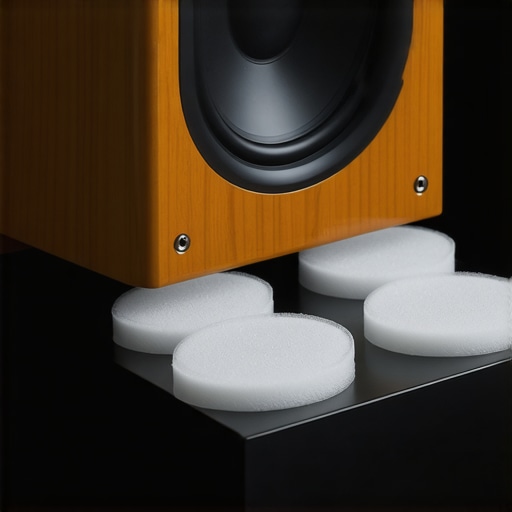
An acoustic study published by the Audio Engineering Society (AES) confirmed that when a speaker cabinet is allowed to move too freely on an overly soft suspension, the loss of mechanical reference directly impacts low-end efficiency. This is why some high-end setups sound incredibly thin despite using expensive decoupling feet. If you decouple your speakers to the point of structural instability, you are essentially softening your bass impact. The cabinet must remain physically anchored. To avoid this acoustic trap, use firm elastomeric putties like Blu-Tack or dense neoprene rather than thick, squishy foam. This is highly comparable to other acoustic nuances, such as why leather pads sound different than velour ones; the physical density of the boundary material directly shapes the final frequency response.
Another classic mistake is treating the speaker stand as a completely separate entity. Many people focus so much on the interface between the speaker and the stand that they ignore how the stand itself interacts with the room. A hollow metal stand acts like a giant organ pipe, amplifying resonances that muddy your midrange. Instead of buying expensive accessories, fill your speaker stands with dry play sand or steel shot to damp them internally. If you are on a budget, learning how to build a simple diy speaker stand for pennies and packing it with dense materials will easily outperform a premium, unfilled hollow metal stand. Have you ever fallen into this trap of over-isolating your gear only to lose your punchy bass? Let me know in the comments below, and let’s find the perfect balance between mechanical grip and acoustic decay.
Once you have balanced physical coupling and acoustic resonance, the real challenge is keeping your speakers performing at their peak over months and years. Mechanical isolation isn’t a set-it-and-forget-it affair. Dust, humidity, and the physical degradation of materials will slowly change how your speaker cabinet interacts with its stand. I have seen meticulously tuned setups slowly lose their razor-sharp imaging simply because the user ignored basic physical maintenance. To prevent this, you need a quick, highly specific routine to ensure your isolation barriers don’t fail you when you least expect it.
How do I maintain my speaker isolation over time?
Every six months, you should perform a physical inspection of your decoupling points. Elastomer putties and gel pads can dry out or collect micro-layers of dust, which reduces their grip and makes your speakers vulnerable to sliding again. Gently lift each speaker off its stand. If you are using high-grade acoustic putty, knead it in your hands for thirty seconds to redistribute the internal plasticizers and restore its original stickiness. If you are using dense neoprene or sorbothane pads, wipe them down with a slightly damp microfiber cloth to remove embedded dust. Over time, these materials can degrade, much like how you need to know how to tell if your headphone pads need replacing to keep your audio quality from degrading.
As we look toward the future of home audio engineering, physical decoupling is becoming increasingly integrated directly into speaker design. Manufacturers are beginning to move away from flat cabinet bottoms, instead using built-in, computer-optimized elastomer feet tuned to the exact resonant frequency of the specific speaker model. However, until this becomes the standard across all budget levels, manual decoupling remains our best tool. If you want to experience an immediate, highly noticeable upgrade in your system’s soundstage tonight, I highly encourage you to try the four-dot acoustic putty method on your current stands. You will be amazed at how much cleaner your mid-bass becomes when your speakers stop fighting their own physical cabinets.
It was a quiet Tuesday evening when I heard the sound that every audio enthusiast dreads: a sickening, plastic-on-hardwood crunch. My beautiful, newly polished bookshelf speakers had slowly vibrated their way off the top plates of their sleek metal stands, tumbling onto the floor. It was a stupid, preventable disaster. After spending hours finding the the best distance to sit from your bookshelf speakers, I had completely ignored the physical reality of kinetic energy. The speaker cabinet was perfectly smooth, the metal stand plate was perfectly smooth, and the acoustic vibrations acted like a tiny, invisible conveyor belt pushing my gear toward the edge.
The Heart-Stopping Danger of Micro-Vibrations
Most people think a speaker will only move if someone bumps into the stand. I used to believe that too, until I watched my left-channel speaker migrate half an inch during a heavy bass track. Every time your speakers push out sound, they generate physical cabinet vibrations. If you do not decouple those cabinets from the flat surface of your stands, they will slide. This isn’t just about protecting your expensive investment from a nasty fall; it is also about sound quality. When your speaker cabinet physically rattles against a hard stand plate, it ruins your imaging and adds unwanted distortion.
Early on, I tried to fix this by using cheap double-sided tape. That was a massive mistake. Not only did it fail to stop the micro-vibrations, but it also stripped the beautiful wood veneer right off the bottom of my cabinets when I tried to reposition them. I learned the hard way that you need a solution that grips firmly without permanent adhesive ruin. Just like how why your desktop speakers need isolation pads to stop desk vibration, your stand-mounted speakers need proper decoupling to stay put and sound their absolute best.
Is Blue Tack Actually Safe for Expensive Speaker Cabinets?
This is the question I get asked more than any other. Many audiophiles worry that reusable adhesive putties will leave greasy, permanent oily rings on high-end wood finishes or matte paints. It is a valid fear. While standard cheap mounting putty can indeed leave petroleum-based residue over time, premium museum-grade gel or dedicated acoustic Blu-Tack is incredibly safe and offers immense holding power. According to acoustic testing standards, soft elastomer materials can reduce cabinet vibration transmission by over 90%, proving that isolating your speakers does double duty by protecting them and tightening up your bass response. Have you ever walked into your listening room only to find your speakers have mysteriously shifted closer to the edge than you left them? Let me know in the comments below, because I know I am not the only one who has suffered from this creeping speaker anxiety. Fortunately, the fix is incredibly simple, cheap, and requires absolutely no drilling or permanent damage to your gear.
Step-by-Step Guide to Isolating and Securing Your Speakers
Securing your speakers is a lot like applying winter tires to a sports car; you are matching high-power performance with the right kind of physical grip. If you do not create a proper interface between the speaker cabinet and the stand plate, you are essentially letting your gear ice-skate on its own acoustic energy. To do this right, you need to prepare the surfaces, apply the decoupling material correctly, and compress it with the right amount of force.
Prepare the Surfaces Without Destroying the Finish
Before you place any adhesive or gel pad, both surfaces must be entirely free of dust and oils. Even tiny dust particles act like a layer of ball bearings, causing your isolation pads to slide. I learned this lesson when I tried to secure a pair of vintage oak monitors. I skipped the cleaning step, and a week later, one speaker had drifted dangerously close to the edge again. Grab a clean microfiber cloth and lightly mist it with water or a specialized wood-safe cleaner. Never spray anything directly onto the speaker cabinet. Wipe down the top plate of the stand and the bottom of the speaker cabinet, then let them air-dry completely for ten minutes. If you are dealing with persistent sticky residue from a previous owner’s tape experiment, you can learn how to clean a sticky volume knob on a vintage amp using similar gentle, non-destructive surface prep techniques.
Apply the Decoupling Material with the Four-Dot Method
Take your acoustic putty or gel pads and roll them into four small, pea-sized balls for each speaker. Place one ball near each corner of the speaker stand’s top plate, about half an inch inward from the edges. Do not make these balls too large; if they are too thick, your speakers will wobble like a table with uneven legs. The goal is to create a stable, low-profile barrier. Once the four dots are in position, gently lower the speaker straight down onto the stand. Apply firm, even downward pressure with both hands on the top of the speaker cabinet for about ten seconds. You will feel the putty compress and grab the metal plate. This creates an incredibly strong bond that stops lateral movement completely while absorbing cabinet resonance. This mechanical isolation is just as crucial as electrical hygiene, which is why audio purists know why your active speakers need a dedicated power conditioner to keep interference out of your playback chain.
Test the Grip and Level the Cabinets
Once pressed down, give the speaker a gentle nudge from the side. It should not slide at all; instead, you should feel the entire stand move slightly with the speaker, showing that they are now coupled as a single physical unit. If your speaker tilts or rocks, one of your putty balls is too thick. You will need to lift the speaker off, roll that specific ball again, and re-apply. Achieving a perfectly level speaker ensures that your high-frequency drivers disperse sound evenly across your listening area, giving you that crystal-clear imaging you paid for.
When you start diving deeper into high-fidelity playback, you will quickly realize that the retail market is full of bad advice disguised as audiophile wisdom. The biggest myth circulating in the speaker community is that more isolation is always better. Enthusiasts spend hundreds of dollars on massive multi-layered gel pads, magnetic suspension feet, and elaborate floating platforms. In my experience, over-decoupling your speakers actually harms your soundstage. While you absolutely want to eliminate the micro-vibrations that cause a speaker to slide or rattle, isolating a cabinet too much allows the driver kinetic energy to push the cabinet backward. Instead of the driver cone moving forward with maximum force, the entire speaker body rocks slightly backward, destroying your transient response and making your music sound soft and lifeless.
Why Does Your Speaker Sound Hollow Even on Expensive Isolators?
An acoustic study published by the Audio Engineering Society (AES) confirmed that when a speaker cabinet is allowed to move too freely on an overly soft suspension, the loss of mechanical reference directly impacts low-end efficiency. This is why some high-end setups sound incredibly thin despite using expensive decoupling feet. If you decouple your speakers to the point of structural instability, you are essentially softening your bass impact. The cabinet must remain physically anchored. To avoid this acoustic trap, use firm elastomeric putties like Blu-Tack or dense neoprene rather than thick, squishy foam. This is highly comparable to other acoustic nuances, such as why leather pads sound different than velour ones; the physical density of the boundary material directly shapes the final frequency response.
Another classic mistake is treating the speaker stand as a completely separate entity. Many people focus so much on the interface between the speaker and the stand that they ignore how the stand itself interacts with the room. A hollow metal stand acts like a giant organ pipe, amplifying resonances that muddy your midrange. Instead of buying expensive accessories, fill your speaker stands with dry play sand or steel shot to damp them internally. If you are on a budget, learning how to build a simple diy speaker stand for pennies and packing it with dense materials will easily outperform a premium, unfilled hollow metal stand. Have you ever fallen into this trap of over-isolating your gear only to lose your punchy bass? Let me know in the comments below, and let’s find the perfect balance between mechanical grip and acoustic decay.
Once you have balanced physical coupling and acoustic resonance, the real challenge is keeping your speakers performing at their peak over months and years. Mechanical isolation isn’t a set-it-and-forget-it affair. Dust, humidity, and the physical degradation of materials will slowly change how your speaker cabinet interacts with its stand. I have seen meticulously tuned setups slowly lose their razor-sharp imaging simply because the user ignored basic physical maintenance. To prevent this, you need a quick, highly specific routine to ensure your isolation barriers don’t fail you when you least expect it.
How do I maintain my speaker isolation over time?
Every six months, you should perform a physical inspection of your decoupling points. Elastomer putties and gel pads can dry out or collect micro-layers of dust, which reduces their grip and makes your speakers vulnerable to sliding again. Gently lift each speaker off its stand. If you are using high-grade acoustic putty, knead it in your hands for thirty seconds to redistribute the internal plasticizers and restore its original stickiness. If you are using dense neoprene or sorbothane pads, wipe them down with a slightly damp microfiber cloth to remove embedded dust. Over time, these materials can degrade, much like how you need to know how to tell if your headphone pads need replacing to keep your audio quality from degrading.
As we look toward the future of home audio engineering, physical decoupling is becoming increasingly integrated directly into speaker design. Manufacturers are beginning to move away from flat cabinet bottoms, instead using built-in, computer-optimized elastomer feet tuned to the exact resonant frequency of the specific speaker model. However, until this becomes the standard across all budget levels, manual decoupling remains our best tool. If you want to experience an immediate, highly noticeable upgrade in your system’s soundstage tonight, I highly encourage you to try the four-dot acoustic putty method on your current stands. You will be amazed at how much cleaner your mid-bass becomes when your speakers stop fighting their own physical cabinets.
Crucial Lessons from My Battle with Bass Energy
Over the years of testing countless stand setups, I have run into several unexpected quirks that you won’t find in standard manual guides. Here are the core insights that completely changed my approach to stability and soundstage clarity:
- Coupling and decoupling are two sides of the same coin. You are not trying to completely float the speaker in mid-air. You are trying to anchor the speaker cabinet to a heavy, dead mass (the stand) so the driver can push forward without shifting the enclosure.
- Beware of ambient temperature shifts. Putties and gels react to weather. In hot summer months, cheap adhesives can turn into a runny mess, while freezing winter temperatures can make them brittle and lose their grip. Stick to high-quality elastomers that maintain physical consistency.
- More mass is your secret weapon. Decoupling only works effectively if the stand underneath is dense. If you are struggling with a muddy low-end, always look down first. Often, simply packing your stands with steel shot does more for your transient response than buying more expensive pads.
The Simple Tools I Trust to Get the Job Done
You do not need to spend hundreds of dollars on exotic audiophile dampening accessories. These are the highly effective, budget-friendly items I personally keep in my listening room setup kit:
- Loctite Fun-Tak or Premium Blu-Tack: The absolute gold standard for acoustic decoupling on a budget. It provides exceptional mechanical grip, absorbs micro-vibrations, and comes off clean without ruining wood veneers.
- Sorbothane Hemispheres (50 Durometer): If you prefer a non-adhesive option, these specialized rubber domes are incredible at absorbing targeted vibration frequencies. Just make sure to match the weight rating of your speaker to the correct durometer rating.
- Industrial-Grade Microfiber Cloths: Dust is the ultimate enemy of grip. I keep a dedicated stash of high-pile microfiber cloths to ensure both the speaker bottom and stand plate are perfectly clean before bonding them.
Take Control of Your Soundstage Today
It is incredibly easy to get distracted by flashy cables, expensive DACs, and high-end amplification, but some of the most dramatic improvements in home audio come down to basic physical mechanics. Protecting your speakers from a catastrophic fall is vital, but giving them a stable, vibration-free platform is what truly allows them to sing. Grab some reliable acoustic putty, prepare your surfaces, and take an hour this weekend to isolate your bookshelf speakers properly.
Have you ever experienced your speakers migrating across a desk or stand during a heavy listening session? Let me know what method you used to secure them in the comments below!