
I’ll never forget the first time I finished a ‘pro’ install in my old hatchback, only to have my heart sink the moment I hit the ignition. Instead of the deep, clean bass I’d spent all Saturday chasing, I was greeted by a high-pitched, whizzing whine that climbed higher every time I stepped on the gas. It was embarrassing. It made my brand-new setup sound like a broken toy. If you’re hearing that ‘alternator whine’ right now, I know exactly how much it stings. But here’s the good news: you don’t have to live with it, and you definitely don’t have to replace your head unit to fix it.
Stop That Annoying Whine Before It Drives You Crazy
Most of us think that as long as a wire is touching metal, the circuit is closed and we’re good to go. That’s the exact mistake I made back in the day when I just looped my ground wire around a painted seat bolt and called it a day. Not only did it cause a massive hum, but it’s also one of the reasons a car amplifier keeps shutting off in summer because poor grounding creates immense heat. You see, your car’s chassis is the return path to the battery. If that path is blocked by paint, rust, or a loose connection, the electricity looks for another way back—often through your RCA cables. That’s when you get that dreaded ‘ground loop’ noise. Have you ever felt like your ‘budget’ gear was just cursed to sound bad? I used to think so, but it’s rarely the hardware’s fault. Even if you’re trying to get rid of the annoying hiss in your budget car amp, the very first thing any real pro will tell you to check is the ground point. If it’s not bare, shiny metal, it’s not a ground. It’s just a suggestion.
Is a new ground point really worth the effort?
You might be skeptical. You might think, ‘It’s bolted to the frame, how much better can it get?’ The reality is that even a tiny bit of resistance—we’re talking less than 0.5 ohms—can be the difference between crystal clear audio and a headache-inducing buzz. In fact, technical data from the Mobile Enhancement Retailers Association (MERA) suggests that the vast majority of noise issues in aftermarket systems are caused by poor installation practices rather than equipment failure. This means there is a very high chance your equipment is actually fine; it’s just crying out for a better connection. If you’ve noticed other weird symptoms, like why your car speakers pop when you turn the key, you are likely dealing with a voltage drop caused by a weak ground. We’re going to fix this today. I’m going to show you the ‘seat-bolt-is-a-lie’ truth and how to find a spot on the chassis that actually works. Have you ever tried moving your ground only to find the noise got worse? Tell me about your most frustrating noise hunt in the comments.
Find a Spot That Actually Conducts Electricity
The most common ‘rookie’ move is using an existing factory bolt. While it looks convenient, many of those bolts go through sleeves or are heavily treated for corrosion, making them terrible conductors. To kill the hum, we need to get aggressive. We’re talking about sanding down to the bare steel. It feels wrong to take sandpaper to your car’s interior, I get it. But once you hear that silence between tracks, you’ll realize it was the best five minutes you ever spent under the carpet. [image_placeholder]
Scrape Away the Resistance
Think of your ground wire like a drainpipe. If that pipe is clogged with debris, the water backs up. In car audio, paint and primer act like a massive clog. I’ve seen people spend hundreds on high-end cables only to bolt them onto a painted surface, which is exactly why your car speakers sound like they are under a blanket. To fix this, you need a wire brush or a bit of 80-grit sandpaper. You aren’t just looking for a little bit of silver; you want a patch of steel that looks like a mirror. If you leave even a thin layer of factory clear coat, you’re inviting resistance to the party. I once spent three hours chasing a hum in a friend’s coupe, only to realize I’d been too ‘gentle’ with the sanding. Once I dug into the metal and re-attached the lug, the silence was immediate and glorious. 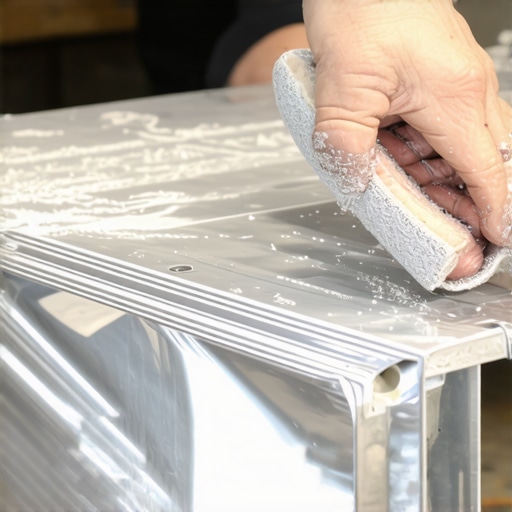
Why Your Ground Wire Must Be Short and Stout
Length is the enemy of a clean ground. Every extra inch of wire adds resistance, and in the world of high-current car audio, resistance is the parent of noise. You should keep your ground wire under 18 inches whenever possible. If you’re mounting your amp in the trunk, don’t try to run the ground all the way back to the battery; the car’s frame is a much better conductor than a long thin cable. While you’re at it, make sure the gauge of your ground wire matches your power wire exactly. If you are learning how to properly bridge a car amplifier for more power, this becomes even more critical because you’re pulling significantly more current through that connection.
The Self-Tapping Screw Trap
Many DIYers reach for a self-tapping screw and a power drill, thinking a quick hole in the floor pan is the solution. I’ve made this mistake myself. Not only is the floor pan often too thin to provide a solid electrical path, but these screws can vibrate loose over time. A loose screw is a major reason why your car speakers cut out when you hit a bump. Instead of a flimsy screw, use a nut and bolt. Drill a hole through a structural part of the chassis (check underneath first!), use a star washer to bite into the metal, and tighten it until it won’t budge.
Avoid Common Interference Paths
Even with a perfect ground, you can still pick up noise if your cables are acting like antennas. Always run your RCA cables on the opposite side of the car from your main power wire. If they have to cross, do it at a 90-degree angle. This prevents the electromagnetic field around the power wire from ‘bleeding’ into your audio signal. If you ignore this, you’ll end up with a clicking or buzzing that mimics why your car door speakers rattle even at low volume, except it’s coming from the signal itself, not the door panel. It’s these small, physical separations that turn a ‘budget’ install into a high-fidelity experience.
Stop Buying Into the High-Res Audio Myth
Most enthusiasts believe that the more they spend on the signal chain, the better the final output will be. However, a common contrarian truth I’ve learned after years of testing is that your ears are often the bottleneck, not the bit rate. We are told that we need 192kHz/24-bit files to ‘hear the artist’s intent,’ but in my experience, most people cannot tell the difference between a high-res file and a well-encoded 320kbps MP3 in a blind test. In fact, a famous study published by the Audio Engineering Society (AES), known as the Meyer-Moran test, demonstrated that listeners frequently failed to distinguish between high-resolution audio and standard CD-quality audio even on high-end equipment. This is exactly why your high-end DAC sounds exactly like your laptops headphone jack if your headphones or speakers aren’t resolving enough to show the difference. Instead of chasing numbers on a spec sheet, focus on the transducer. A $500 pair of speakers with a $50 amp will almost always outperform a $5,000 amp connected to $50 speakers. 
The Dangerous Trap of Extension Cords
One of the most common ‘expert’ mistakes happens when setting up high-current home theaters or professional amplifiers. People think power is power, but the delivery method matters immensely. I’ve seen audiophiles drop thousands on a receiver and then plug it into a flimsy $5 power strip. This is why you should avoid using an extension cord for your power amp. Thin-gauge cords create voltage drops during transient peaks—like a sudden explosion in a movie or a heavy bass hit—which chokes the amplifier’s performance. It’s like trying to run a fire hose through a drinking straw. If your amp can’t pull the current it needs instantly, you lose dynamics and increase distortion. Have you ever felt like your system sounded ‘flat’ during loud scenes despite having plenty of wattage? You might just be starving it of electricity. Let me know in the comments if you’ve ever noticed a difference after upgrading your power delivery!
How much headroom does your system really need?
A sophisticated question I often get is whether a 200-watt amp is ‘better’ than a 50-watt amp if you only listen at low volumes. The answer lies in headroom. High-quality audio isn’t about being loud; it’s about the ability to handle peaks without clipping. If you don’t know how to tell if your amplifier has enough headroom for your speakers, you might be pushing your gear into ‘soft clipping’ without even realizing it, which takes away the sparkle and clarity. This is especially true for mobile listeners; it’s a major reason why your expensive headphones sound thin on a basic smartphone. The phone simply doesn’t have the voltage swing to move those high-impedance drivers with authority. It’s not that the headphones are bad; they are just under-driven. Real expertise is knowing when to stop buying gear and when to start optimizing the environment and power you already have. Have you ever fallen into the trap of buying more power when you actually needed better speakers? Tell me your story below.Building a high-fidelity system is half the battle; the real test is keeping it from degrading into a noisy, muffled mess. I’ve seen enthusiasts drop five figures on gear only to let it wither away because they didn’t realize that metal oxdizes and dust is actually conductive. If you’ve ever noticed a crackling sound when you adjust the volume, you don’t need a new amp. You just need to know how to fix a scratchy volume dial with electrical contact cleaner. I personally keep a can of DeoxIT D5 in my drawer at all times because it doesn’t just clean; it leaves a microscopic protective layer. It is the same stuff the pros use on multi-million dollar consoles to ensure a clean signal path.
Stop Letting Environmental Factors Kill Your Sound
If you live in a humid climate or near the ocean, your connections are under constant attack. Salt and moisture create a green crust that can ruin your frequency response. Learning how to clean green oxidization off your copper speaker terminals is an essential skill if you want to avoid that ‘veiled’ sound that creeps up over time. Even your mobile gear isn’t safe. I can’t tell you how many people I’ve helped who thought their DAC was broken, but they just needed to learn how to clean dust out of your headphone jack without damaging pins. Pocket lint is highly compressed and can prevent a full electrical connection, leading to one-sided audio or thin bass. 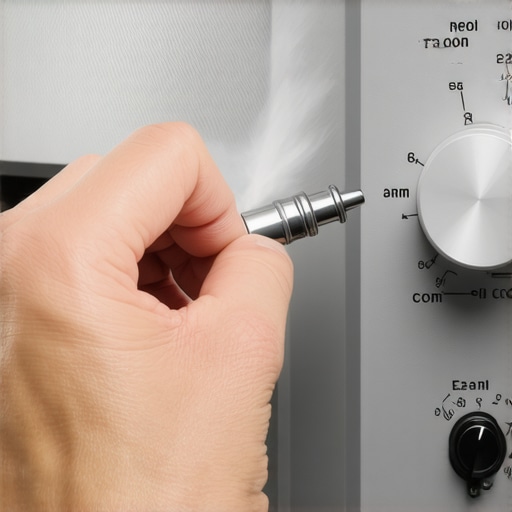
Grab a Multimeter and Stop Guessing
Real expertise involves moving beyond ‘it sounds okay’ to ‘it measures perfectly.’ A basic digital multimeter is the single best investment you can make for your audio hobby. I use mine to check for voltage drops and to verify that my ground impedance is near zero. As Bill Whitlock of Jensen Transformers—a true legend in the field of system grounding—has frequently documented, many system-wide noise issues are the result of ‘ground loops’ that could be identified in seconds with a simple continuity test. If you are dealing with older equipment, you should also be looking for internal wear. Knowing how to tell if your speakers capacitor is starting to fail can save you from a blown driver later on. Capacitors have a shelf life, and when they drift out of spec, your crossover points move, which is a major reason why your vintage speakers are losing their punch over time.
How do I maintain my audio equipment for the long haul?
Maintenance isn’t just about cleaning; it’s about physical integrity. For home theater owners, I always recommend the ‘paper test.’ It’s a low-tech way of ensuring your enclosures haven’t warped or developed tiny gaps. By using the simple paper test for finding air leaks in your speaker cabinet, you can ensure that your bass stays tight and controlled. Any air escaping where it shouldn’t will cause turbulence and audible chuffing.
The Future is Smart and Wire-Free
While we’ve focused on the physical side, the industry is moving rapidly toward sophisticated Digital Signal Processing (DSP) and high-bandwidth wireless protocols. We are entering an era where AI-driven room correction will be built into even entry-level soundbars, automatically compensating for poor room acoustics. However, even the smartest software can’t fix a bad electrical connection or a leaky cabinet. My advanced tip for you this week: Go to your main amplifier, unplug the speakers, and give the terminals a quick wipe with 90% isopropyl alcohol. You might be surprised at how much ‘shimmer’ returns to the high end just by removing a year’s worth of atmospheric buildup.
Lessons Bought with Sweat and Solder
After years of tearing apart car interiors and debugging home theater racks, I’ve realized that the most expensive gear in the world can’t save a bad installation. First, always verify your source. I’ve seen people spend days troubleshooting a car amplifier only to realize the noise was coming from a cheap aux-to-USB adapter. Second, your battery is the heart of the system; if it’s struggling, your audio will too. Third, don’t be afraid to redo your work. If that ground point isn’t perfect, just bite the bullet and move it. Lastly, remember that even high-end home setups have quirks, like the reason your expensive receiver makes a clicking sound when it starts, which is often just a normal protection relay doing its job. Understanding the ‘why’ behind the noise is what separates a hobbyist from an expert.
The Handful of Tools That Save My Sanity
If you’re serious about maintaining your system, you need more than just a screwdriver. I never start a project without my digital multimeter to check for ground resistance. For home enthusiasts, I can’t recommend enough the reason your speaker stands need to be filled with sand—it’s the cheapest way to tighten up your low-end response and stop unwanted resonances. I also swear by a dedicated ‘test loop’ of high-fidelity files that I know inside and out; they allow me to hear if a buzzing sound in your portable speaker at high volumes is a physical rattle or an electronic signal issue. Finally, keep a set of plastic trim tools in your glovebox—they prevent you from scarring your dashboard when looking for those hidden wire runs.
Take the First Step Toward a Buzz-Free Life
Audio troubleshooting can feel like chasing ghosts, but the reward is a listening experience that lets you forget the equipment and just feel the music. Whether you’re trying to figure out how to get deep bass from a soundbar without using a subwoofer or hunting down a ground loop in your trunk, the process is exactly the same: isolate, test, and verify. Don’t let a little whine or hiss stop you from enjoying your favorite tracks. You have the knowledge now to turn a mediocre car amplifier setup into a professional-grade soundstage. It’s time to stop settling for ‘good enough’ and start demanding perfection from your system. Have you ever spent days chasing a noise only to find it was something incredibly simple? Let me know your most ridiculous fix in the comments below!