
I was sitting in my favorite worn-out leather chair, the one that’s perfectly molded to my back, with a cold drink and a stack of vinyl. I’d just finished a long week and all I wanted was to hear the warm, thumping low-end of my vintage towers. But as soon as the needle dropped on a bass-heavy track, that dreaded skittering sound filled the room. It wasn’t the music; it was the sound of a mechanical failure. I peered through the mesh and there it was—a jagged, half-inch split in the foam surround. My first thought? “Well, there goes three hundred bucks.” I’d made the same mistake years ago when I panicked and replaced a driver that only had a tiny nick, much like the time I wasted a whole afternoon trying to figure out the reason one side of your earbuds is quieter than the other when it was just a simple cleaning issue. I didn’t realize then that a simple, five-dollar fix could have saved me a fortune. Today, we’re going to tackle that fear head-on and get your system back to peak performance.
Your Speakers Aren’t Dead They Just Need a Band-Aid
I’ve seen so many people toss away incredible gear because of a little dry rot or a stray fingernail poke. It’s heartbreaking. In my early days, I was the guy who tried to use duct tape or even high-strength Super Glue to “seal” a tear, only to find out that a stiff surround is just as bad as a torn one. I was nineteen, impulsive, and I learned the hard way that the glue dried into a glass-hard ridge that literally snapped the foam the first time I turned the volume up. If the surround can’t move, the speaker can’t breathe. You’ve likely spent time making sure your setup is perfect, maybe even learning how to tell if your speaker capacitors are starting to leak or figuring out how to fix a rattling speaker grill without using messy glue, so why give up now? A tear is just a temporary setback. We aren’t just slapping some goop on there; we are performing a precise surgical strike to restore the flexibility your woofer needs to move air. Have you ever felt that sinking feeling when your favorite piece of gear starts acting up? Don’t let it win.
Is Rubber Glue Actually Going to Hold Up?
It sounds like a “hack,” doesn’t it? You might be skeptical that a bottle of adhesive from the hardware store can replace a professional reconing service. But here is the secret: most professional repair kits use a specific type of nitrile or butyl rubber adhesive because it remains flexible once cured. According to technical research from the Audio Engineering Society (AES), maintaining the “compliance”—the springiness of the outer suspension—is vital for keeping the resonant frequency where it belongs. If you use the wrong material, you change the sound of the speaker entirely. This is a much more delicate process than learning how to clean your speaker cones without ruining the paper, but it’s just as rewarding. Remember, these speakers are already broken-in; they have that sweet, seasoned sound that only comes after why your new speakers sound better after 20 hours of use. Why would you want to start over with a stiff, new driver when you can keep the soul of your current ones alive? Stick with me, and I’ll show you exactly how to apply that glue so it looks and sounds like it came from the factory.The secret to a repair that lasts a decade isn’t actually the glue—it’s the scraper. You need to get every last bit of that crumbly, orange-brown rot off the metal basket before you even think about opening your adhesive. Imagine trying to tape a heavy box with dusty tape; it just isn’t going to stick. I learned this the hard way back in college when I rushed a pair of vintage Advent Loudspeakers. I thought I could just glue over the old residue to save twenty minutes. Two days later, during a particularly heavy bass passage in a Pink Floyd track, the surround literally peeled away mid-song. I spent twice as long scraping dried, messy glue off the frame than I would have if I’d done it right the first time.
Strip Away the Decay Before You Start
Take a small flathead screwdriver or a specialized plastic scraper and work your way around the metal basket. You want to see the shine of the metal. If the residue is stubborn, a tiny bit of isopropyl alcohol on a rag can help, but be extremely careful not to let it drip onto the cone if it’s made of paper. While you have the driver out and exposed, it is the perfect time to check the back of the unit; you might want to learn how to fix a loose speaker terminal on your cabinet if yours have been wobbling for years.
The Scraper Is Your Best Friend
Once the basket is clean, you have to tackle the edge of the cone. This is the delicate part. If you have paper cones, use your fingernail or a very dull edge to gently flake off the old foam. If you’re too aggressive, you’ll thin out the paper and create a weak spot. It’s a lot like the patience required for the simple way to fix a rattling metal speaker grill; rushing only leads to more noise later. 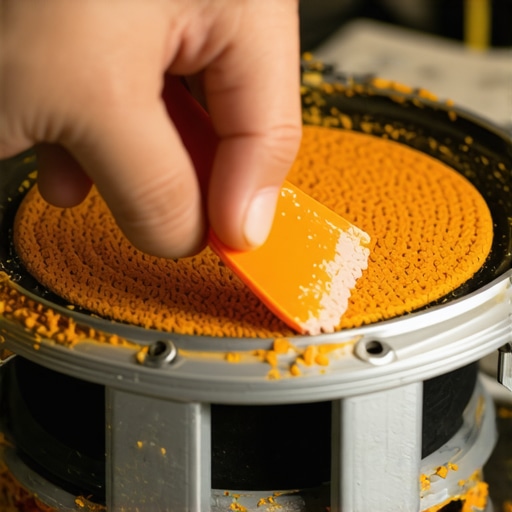
Centering the Cone Is Your Only Mission
This is where most people get nervous. If the new surround is glued even a millimeter off-center, the voice coil will rub against the magnet. That creates a scratchy, distorted sound that ruins the listening experience. Professional shops often cut the dust cap and use plastic shims, but you can do this at home by using a 30Hz test tone. By playing a low, silent frequency through the speaker while the glue is still tacky, the magnet naturally helps center the coil. Speaking of testing, once the glue has fully cured, you’ll want to know the easy way to test if your speakers are out of phase to ensure the movement is synchronized across your pair.
Avoid the Dreaded Voice Coil Rub
Apply a thin, consistent bead of glue to the inner lip of the surround first. Attach it to the cone and let it set for about twenty minutes. Only then should you move to the outer lip that attaches to the basket. This two-stage process prevents the surround from sliding around while you’re trying to seat it. It is a similar principle to why your door speakers sound better after adding sound deadening; you are essentially managing the mechanics of the driver to ensure only the intended vibrations reach your ears. If you feel the motor structure getting unusually warm during your tone testing, check how to tell if your amp is running too hot to rule out electronics issues. Finally, grab your tools and do a final sweep. If you suspect any signal drops after re-installing, knowing how to use a multimeter to find a short in your speaker wires will help you confirm that your surgical repair was a total success.Let’s dig deeper into why even a perfectly repaired driver can still sound lackluster if you’re falling for common industry myths. Many enthusiasts believe that simply patching a tear or replacing a foam surround restores the speaker to its factory-new performance, but the reality is that the surrounding electronics and room environment play a massive role in whether that repair actually sings. For instance, a common belief is that moving to a modern Class D amp is a guaranteed upgrade for any system. However, the reason your passive speakers sound quiet with a digital amp is often due to how these high-efficiency units interact with the complex impedance curves of older, repaired drivers. They are efficient, yes, but they can struggle to provide the instantaneous current needed when a woofer’s resistance dips at certain frequencies.
Digital Amps Aren’t Always the Best Choice
In my experience, the colder nature of some digital amplification can highlight the stiffness of a new surround before it is fully broken in, leading to a sterile sound profile. If you are sticking with vintage gear to power your newly fixed speakers, you have to be vigilant about more than just the cones. You should definitely know how to tell if your amps capacitors are failing, because if your power source is unstable, even the most perfect surgical repair won’t stop the distortion. I once spent an entire Saturday thinking I’d botched a surround job, only to realize my old Marantz receiver was leaking DC current through the outputs.
Is Your Listening Room Actively Fighting Your Speakers?
This is the hidden nuance most people ignore: the room itself is an active acoustic component. A study by the Harman International research group concluded that the room’s influence and placement can account for up to 50 percent of the overall sound quality we perceive. This means your speaker placement is just as critical as the glue you used. One major mistake I see beginners make is hiding their gear for aesthetic reasons. For example, why you should never place your subwoofer inside a cabinet is simple—the enclosure becomes a secondary resonator that muddies the bass and creates standing waves.
How a Simple Rug Outperforms a Thousand-Dollar Cable
Instead of being tricked into buying audiophile grade cables, focus on the physical environment first. I’ve seen people drop a fortune on wiring while their speakers sat on a bare hardwood floor, which causes massive high-frequency smear due to reflections. Learning how to use a rug to stop your speakers from sounding harsh is arguably the most cost-effective way to improve your system’s imaging. By absorbing those first reflections, you allow the detail of your newly repaired drivers to reach your ears without interference. 
Why More Watts Won’t Save Your Sound
The trap of chasing wattage is another one that catches many off guard. People think more watts equals more volume, but the damping factor—the amp’s ability to control the cone’s physical movement—is what actually matters for a repaired speaker. A high damping factor ensures that once the music stops, the cone stops, preventing the flabby bass common in poorly matched systems. If your amp cannot grip the woofer, that new surround you just installed will feel sluggish and slow. This is why pairing is an art form that goes beyond the specs. Have you ever fallen into this trap where you bought a piece of gear that everyone raved about, only to find it sounded like garbage in your specific room? Let me know in the comments.One thing I’ve learned from decades of tinkering is that your system is only as strong as its weakest connection. It’s not just about the big components; it’s about the maintenance rituals that prevent those annoying Gremlins from showing up in the first place. I keep a small kit at my desk that includes a bottle of Caig DeoxIT D5 and a high-quality digital multimeter. If you’ve ever wondered why your receiver clicks when you change the volume, you know that mechanical parts eventually fail or get dirty. I personally use DeoxIT on every vintage pot and switch because oxidation is the silent killer of great tone. Learning how to clean gold-plated connectors without ruining the finish is another essential skill; even a microscopic layer of grime can increase resistance and dull your high-end clarity. For those of us who love the feel of old-school sliders, knowing how to fix a scratchy fader on a vintage audio mixer can save a piece of gear from the landfill.
How do I keep my vintage gear running for another thirty years?
The secret is heat management and proactive part replacement. According to technical service bulletins from McIntosh Laboratory, the life expectancy of electrolytic capacitors is shortened significantly when they operate in high-heat environments without proper ventilation. This is why I always check how to tell if your amps capacitors are failing at least once a year. If you see bulging tops or a brownish crust, it’s time for a recap. Don’t wait for them to leak and eat through your circuit board. Beyond the internal components, don’t forget the wear and tear on your peripherals. For instance, checking for 7 signs your headphone pads need replacing today can drastically improve the seal and sub-bass response of your favorite cans. 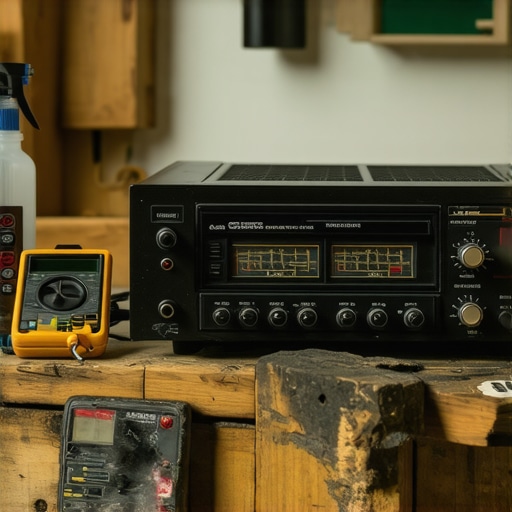
Your Future Sound Will Be Calibrated by Software
As we look ahead, the trend in home audio is shifting toward active, software-corrected systems. I predict that in the next five years, we will see ‘smart’ surrounds that use embedded sensors to detect foam rot or stiffness and automatically adjust the DSP to compensate for the change in resonant frequency. Until then, we rely on tools like the UMIK-1 microphone and Room EQ Wizard (REW). I spent a whole weekend measuring my listening room and realized my ‘bass problem’ was just a standing wave that I fixed by moving my chair six inches. It’s also worth implementing the best way to label your messy home theater cables now, because as you scale up to more channels, a single mislabeled wire can lead to hours of frustration. My final piece of advice? Don’t be afraid to open things up. Buy a can of contact cleaner today and hit those scratchy knobs on your old amp. You’ll be shocked at how much detail has been hiding behind a little bit of dust.
The Hard Truth About My Early Repair Fails
Looking back at my first dozen DIY attempts, the biggest mistake wasn’t the technique; it was the impatience. I used to think that once the glue dried, the job was done. But audio gear is a living, breathing mechanical system. I learned that ignoring the physical room can nullify even the most expensive repairs. For example, knowing why your floorstanding speakers sound boomy in the corner is often more important than the brand of foam you use. If you don’t address the placement, that fresh repair will still sound muddy.
- Solder is always better than a twist: Never rely on electrical tape for internal wiring; it degrades over time, loses its grip, and adds unnecessary resistance.
- Cleanliness is a performance metric: Dust on a circuit board acts as a thermal insulator, trapping heat and killing capacitors long before their natural expiration date.
- Measure twice, glue once: If you are dealing with a vintage amp, always look into how to fix channel imbalance on a vintage stereo amplifier before assuming the speakers are the culprit.
My Personal Audio Restoration Kit
You don’t need a professional laboratory to get high-end results, but you do need the right chemistry. I never start a project without a bottle of DeoxIT D5 to treat scratchy pots and a high-quality multimeter to check for continuity. I also recommend keeping some specialized cleaners on hand; if you have picked up a piece of gear from a thrift store or estate sale, you will definitely want to know how to get the smell of smoke out of a vintage receiver before it permeates your entire living room. Finally, do not get sucked into the marketing hype regarding cabling materials. Understanding the real difference between gold and silver plated connectors will save you hundreds of dollars that you can put toward better drivers or room treatment instead.
Resurrecting the Soul of Your Sound
There is a unique, tactile satisfaction in hearing a speaker sing again after it has been silent for years. It is not just about finding the best home audio deals; it is about preserving a piece of engineering history and keeping that warm, seasoned sound that modern plastic speakers simply cannot replicate. Don’t let a small tear or a scratchy knob intimidate you. Pull that driver out, get your hands dirty, and trust the process. Your ears will thank you for the effort. Have you ever accidentally ruined a driver while trying to fix it? Let me know below.