
I still remember the first time I dragged a pair of 1970s Pioneers home from a dusty garage sale. I was convinced I had found the holy grail of thrift store finds. But when I hooked them up to my receiver, the disappointment hit me like a ton of bricks. The bass was thin, the mids were hollow, and they sounded more like a cheap transistor radio than the legendary hi-fi gear I’d been dreaming of. I spent hours wondering why your vintage speakers are losing their punch over time, only to realize the problem wasn’t the electronics—it was the rubber surrounds. They had turned into stone. I almost tossed them in the trash, but luckily, I learned a simple trick that saved those drivers and my bank account. Today, I’m going to show you how a basic rubber treatment can breathe new life into your gear without the hassle of a full rebuild.
Your Vintage Speakers Aren’t Blown, They’re Just Stiff
It’s a common misconception that if an old speaker lacks bass, the voice coil is shot. Most of the time, the rubber surround has simply lost its plasticizers. When that rubber hardens, it acts like a brake on the cone, preventing it from moving freely. I made a massive mistake early on by spraying a pair of woofers with industrial silicone meant for car doors; it ended up eating through the adhesive and turning the surround into a gooey mess within a month. Don’t be like me.
Will This Rubber Treatment Actually Melt My Cones?
This is the biggest fear for any audiophile, and it’s a valid one. You might be thinking that putting any chemical on a vintage driver is a recipe for disaster. However, if you use a high-quality rubber conditioner or even a specific blend of brake fluid (the non-corrosive type used by professional restorers), you aren’t ‘melting’ the rubber; you’re re-hydrating it. According to experts at the Smithsonian Museum Conservation Institute, the deterioration of rubber is often caused by oxidation, and while you can’t truly ‘reverse’ time, you can certainly restore the mechanical compliance of the material to get that cone moving again.
The Secret to Getting That 1970s Warmth Back Without a Full Re-Foam
Sometimes you look at a driver and think it’s time for a total overhaul. You might even start researching how to revive old speakers with new foam surrounds. But before you go cutting away at your precious vintage components, try a topical treatment first. It’s significantly cheaper and less invasive. When the rubber is supple, the speaker can finally reach its intended excursion, which is the truth about speaker break-in periods coming full circle—you’re essentially ‘re-breaking’ them in. Have you ever brought home a ‘steal’ from an estate sale only to find the woofers were as stiff as a frozen pizza? Let me know in the comments because I’d love to hear your success stories (or your horror stories) before we dive into the step-by-step process.
Test the Compliance with a Gentle Push
Before you pour any chemicals onto your drivers, you need to verify the actual state of the rubber. Place your fingers evenly around the center dust cap and apply light, even pressure. If the cone resists like a sheet of plywood rather than a trampoline, the rubber has definitely fossilized. This manual check is the first thing I do when determining how to tell if your speaker is actually blown or just rattling. If it doesn’t move, the voice coil can’t do its job, and you’re essentially listening to a tweeter trying to pretend it’s a woofer. A stiff surround forces your amplifier to work ten times harder, which is often why your vintage amp gets hot even when you arent playing music at high volumes—it is fighting the physical resistance of the speaker itself.
Apply the Treatment Like You Are Painting a Masterpiece
Once you have confirmed the stiffness, you need a high-quality rubber conditioner or, for the more adventurous DIYers, a tiny amount of non-silicone brake fluid. Use a small artist’s brush or a cotton swab. You are not trying to soak the cone; you are targeting the ‘hinge’ of the rubber surround. Think of this like applying lotion to extremely dry skin. You want to coat the surface evenly without letting the liquid run down into the voice coil gap. If the fluid reaches the center, it could dissolve the adhesive holding the coil together. 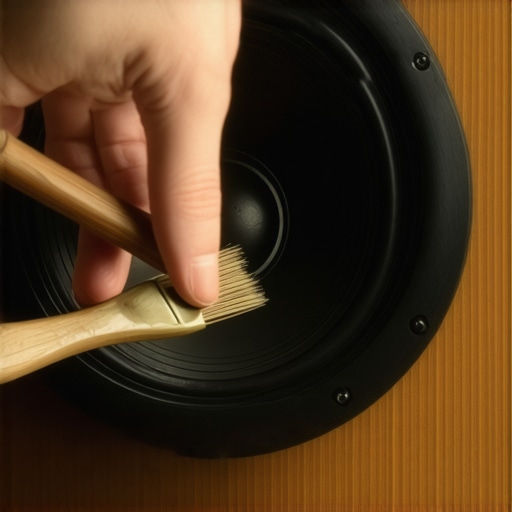
The Night I Almost Drowned My Advent Woofers
I remember sitting on my kitchen floor with a pair of Large Advents, feeling overconfident. I didn’t use a brush; I just tipped the bottle of conditioner directly onto the edge. Within seconds, the liquid began to pool at the bottom of the frame. I panicked, thinking I’d just turned a $200 set of speakers into boat anchors. I spent the next hour using the simple paper towel trick for finding speaker air leaks just to make sure I hadn’t eaten a hole through the seal. The result was messy, but after a few days of ‘curing,’ the woofers regained a flexibility I hadn’t felt in decades. The bass went from a dull ‘thud’ to a deep, resonant growl that filled the room.
Give the Material Time to Breathe
Restoring rubber isn’t an instant fix. The plasticizers need time to migrate back into the cellular structure of the material. After the first application, let the speakers sit for at least 24 hours. You might notice the rubber looking ‘thirsty’ as it absorbs the treatment. If it still feels stiff after a day, apply a second, thinner coat. This process is vital for acoustic suspension designs because they rely on a perfect seal to function; it is the secret to how to get better bass from a sealed subwoofer box. While you wait, check your other components. It’s a great time to ensure your connections are solid, especially since why your vintage receivers lights are flickering with the music could indicate a power draw issue that a stiff, power-hungry woofer was only making worse.Most audiophile forums will tell you that if your vintage system sounds ‘dark’ or ‘veiled,’ you need to upgrade your signal chain immediately. They’ll point you toward expensive silver cables or a new preamp. But here is the contrarian truth: in a vintage setup, the electronics are rarely the primary bottleneck for ‘warmth.’ If those rubber surrounds are even 10% stiffer than they were in 1975, no amount of digital processing will fix the phase shift and frequency roll-off. In many cases, why your high-end DAC sounds exactly like your laptops headphone jack is simply because your speakers have become a mechanical ‘low-pass filter’ that physically cannot vibrate fast enough to show off that high-resolution detail. To get that legendary sound back, you have to address the hardware first.
The Dangerous Trap of Ignoring Your Crossover
While we are focusing on the physical rubber, there is a silent killer lurking inside the cabinet: the electrolytic capacitors. If you successfully soften the rubber and the bass returns, you might suddenly notice the high-end sounds ‘crunchy’ or ‘smeared.’ This is the ‘Oops’ factor most beginners miss. When you restore mechanical movement to the woofer, you change the load on the crossover network. If your caps have drifted out of spec over forty years, you risk blowing a tweeter because the crossover frequency has shifted into dangerous territory. Learning how to tell if your speakers capacitor is starting to fail is the logical next step after you’ve tackled the surrounds. I once ‘fixed’ a pair of KEFs only to have the crossover literally smoke ten minutes later because I ignored the internal guts.
Can Software Ever Fix a Physically Stiff Speaker?
I get asked this a lot by the younger crowd: ‘Can’t I just use EQ to boost the bass?’ The short answer is no. According to Dr. Floyd Toole, a renowned expert in acoustics and author of ‘Sound Reproduction,’ the physical linearity of a transducer is the foundation of high-fidelity sound. If the surround is stiff, it introduces non-linear distortion that digital EQ cannot ‘un-map.’ Instead of forcing your amp to push more power into a stuck cone, use your technology to diagnose the problem first. You can how to use your phone to measure your rooms frequency response to see exactly where the roll-off starts. This data tells you if the rubber treatment is actually working or if you’re fighting a losing battle against physics.
Fix Your Room Before You Blame Your Drivers
Sometimes, the lack of punch isn’t just the rubber—it’s the floor. If you’ve treated the surrounds and the bass still feels ‘thin,’ you might be dealing with phase cancellation. Before you tear the speakers apart again, remember that why you should use a rug to fix a bright-sounding room is often the missing piece of the puzzle for vintage gear. Reflected sound waves can literally ‘eat’ your bass frequencies before they reach your ears. Pair a thick rug with a bit of experimentation on how to find the sweet spot for your speakers in a rectangular room, and you’ll find that 1970s warmth you’ve been chasing. Have you ever fallen into this trap where you spent money on gear when a simple room adjustment or a $5 bottle of conditioner was the real answer? Let me know in the comments!
Stop the Static Before It Kills Your Tweeters
Beyond the rubber surrounds, the biggest enemy of your vintage setup is oxidation inside the controls. I cannot tell you how many times I’ve seen people throw away a perfectly good Sansui or Pioneer because one channel was cutting out. Usually, it’s just a dirty potentiometer. I personally keep a can of Caig DeoxIT D5 on my workbench at all times. This stuff is the gold standard for a reason. I once had a Marantz that would crackle so loudly it actually triggered the protection circuit. Instead of taking it to a pro, I spent ten minutes learning how to fix a scratchy volume knob on an old amp. A quick blast into the back of the dial, a few dozen turns to work it in, and the audio was as clean as the day it left the factory. If you skip this, that sudden ‘pop’ from a dirty switch can send a DC spike straight to your newly treated woofers, undoing all your hard work. According to technical documentation from Caig Laboratories, their formula is designed to dissolve oxides without damaging the surrounding plastics—a critical distinction from cheap hardware store cleaners that can actually melt vintage circuit boards.
How do I keep my vintage setup sounding fresh for another decade?
Consistency is the secret to longevity. You don’t need to treat your speakers every month, but a yearly ‘health check’ is mandatory. I set a calendar reminder every October to check for any new stiffness in the surrounds and to ensure the cabinets are still airtight. This is when I use the simple paper test for finding air leaks in your speaker cabinet. If the seal is failing, your bass response will suffer, no matter how soft the rubber is. 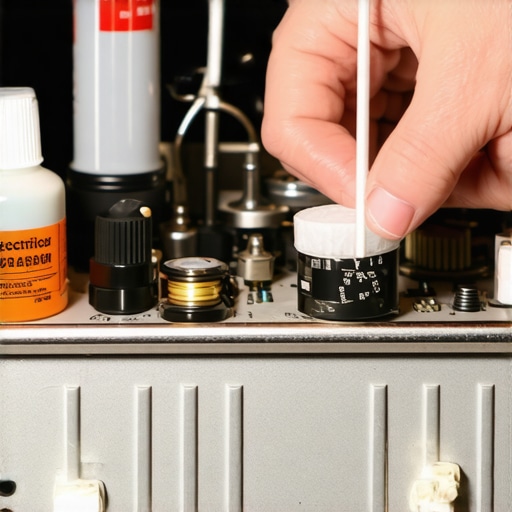
Your Smartphone Is Actually a Pro-Level Audio Lab
You don’t need a $2,000 oscilloscope to tune your room anymore. I use a calibrated microphone plugged into my phone to run real-time analysis (RTA). This allows me to see the exact frequency response of my vintage gear in my specific living room. If I see a massive dip at 60Hz, I know my speakers are out of phase or my placement is off. It’s much more effective than guessing, and it helps you understand how to use your phone to measure your rooms frequency response to catch issues before they become audible. I predict that the next five years of the hobby will be dominated by this ‘Hybrid Hi-Fi’ approach—using modern digital tools to maximize the performance of 50-year-old analog components. You can even give your vintage rig a modern brain by learning how to use an old phone as a dedicated high-res music player, effectively bypassing the noisy internal DACs of modern laptops.
Don’t Ignore the Hum and the Hiss
If you’ve softened the rubber and cleaned the knobs but you still hear a low-frequency buzz, you’re likely dealing with a ground loop. This is a common headache when mixing vintage 2-prong plugs with modern 3-prong grounded gear. I’ve spent sleepless nights chasing ghosts in my wiring, only to find that why your vintage receiver makes a loud hum with no music playing is usually down to a simple shielding issue. If you want a quick win today, grab a can of electrical contact cleaner and hit every input jack on the back of your receiver. You’ll be shocked at how much detail returns when you remove forty years of grime from the signal path. My challenge to you: pick one ‘scratchy’ knob on your gear this weekend and clean it properly. You might just save yourself the cost of a brand-new amplifier.
The Hardest Lessons I Learned Resurrecting Dead Drivers
Reflecting on my years of tinkering, I have realized that mechanical health always beats electrical specs in the vintage world. You can have the best receiver in the world, but if your woofers are physically stuck, you are hearing a shadow of the music. One major takeaway is that a stiff surround creates massive resistance, which is often why your receivers protection mode keeps triggering at high volume even when your wiring looks perfect. Another lesson? Patience is a literal tool. Applying a chemical and immediately blasting music is the fastest way to tear a weakened cone. Let the treatment soak in; it is better to wait 48 hours for a successful restoration than to rush into a permanent tear. Lastly, never assume quiet speakers are dead; often, the sound is just being strangled by forty years of hardened rubber.
My Essential Toolkit for Bringing Audio Back to Life
I never start a project without my Big Three. First is Caig DeoxIT D5; it is the only thing I trust for cleaning vintage components, and learning how to fix a scratchy volume dial with electrical contact cleaner is a skill that will save you hundreds in repair fees. Second is a high-grade non-silicone rubber conditioner—look for something specifically designed for automotive seals or industrial rubber to avoid the long-term melting issues caused by cheap sprays. Third is a simple calibrated measurement microphone. Using a phone app is great, but a real mic helps you verify the low-end extension after your rubber treatment. I also swear by a high-intensity LED flashlight to spot those tiny cracks in a surround before they become gaping holes that require a full re-foam.
#IMAGE_PLACEHOLDER_E#
Your Vintage Gear Is Waiting for a Second Chance
There is a profound satisfaction in taking a piece of equipment that was destined for a landfill and making it sing again. This rubber treatment process is not just about maintenance; it is about preserving a piece of history and reclaiming the warmth that modern plastic speakers often lack. Whether you are dealing with a stiff woofer or just setting up a new find, you should also learn how to tell if your speakers are out of phase in 30 seconds to ensure your newly softened drivers are working together, not against each other. Don’t be afraid to open those cabinets and see what is happening inside. Often, the solution is much simpler and more affordable than the audiophile forums lead you to believe. Once you hear that first deep, resonant bass note return, you will never look at a garage sale find the same way again. Have you ever found a pair of speakers that looked perfect but sounded terrible because of stiff surrounds? Let me know your success stories in the comments below!